skip to main |
skip to sidebar
I often visit different forums to learn new tricks, keep up to date with new technology and techniques and sometimes just to hang out and talk trash amongst other fellow producers and studio junkies.
A few days ago a user posed the question "Which part of the song do you write first?". Now after a few responses it was clear that there was no one way to start a song. Some people start with a bassline. Some people start with drums or a groove. Some people start with a synth riff. I've even heard in an interview with the french producer, Martin Solveig, that he would start by sitting in front of a microphone and make random sounds and noises until he found one he liked.
So that's all well and good; everyone is different and we each work in different ways. Eventually one user mentioned that they load up their basic template and go from there. This made me think about my own template and how I use it. I know that it has saved me a lot of time in the studio. After starting a few songs I realised that I would be grabbing for the same effects and presets for different tracks. So, why not turn that base set into a template?
I'll take the time to tell you about my template, how I have everything set up and why. Once again, this isn't the only way to put together a template but it helps me and it may help you.
My base template consists of 8 tracks (Kick, Bass, Snare, Hats, Percussion, Synth 1, Synth 2, and Vocals) and 3 return tracks (Reverb, Delay, Perc).
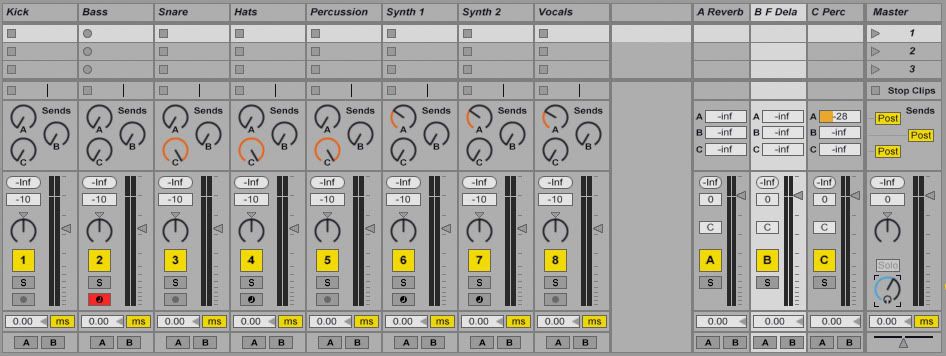
1 - Kick This audio track is solely for my main kick drum. On this track I've got a high pass filter to cut out all the muddy frequencies below around 25Hz. I've also got a frequency analyser to help me EQ the bass to get it with sit with the kick.
2 - BassThis midi track is for my main Bass synth; Blue, Bassline, Elek7ro etc. As with the Kick track I've got a high pass filter to cut out all the muddy frequencies below around 25Hz. Using a frequency analyser and an EQ I can then EQ the bass to get it to sit with the kick. See my previous post on Kick and Bass EQ.
3 - SnareAs I tend to write my drums first the next audio track is for the snare drum. There are no effects on this channel but it is routed only to the C Perc return. More about this later.
4 - HatsThis midi track is loaded with an Impulse to look after all my hat samples. There are no effects on this channel but it is routed only to the C Perc return.
5 - PercussionThis audio track is ready for chopped up percussion styles. Sometimes I'll even duplicate this track depending on how many layers I end up working with. There are no effects on this channel but it is routed only to the C Perc return.
6 - Synth 1This midi track is ready for my main synth line. On this track I've got a high pass filter to roll-off frequencies below about 150-350Hz. This gives the kick and bass room in the mix. Send A is then set to send the track to both the Master and the A Reverb return. I'll then adjust this send to raise or lower the amount of reverb I want.
7 - Synth 2Same as above.
8 - Vocals/SamplesThis audio track is for the vocals or any melodic samples that I end up using. On this track I've got a high pass filter to roll-off frequencies below about 150-350Hz. This gives the kick and bass room in the mix and also removes those popping sounds that you get in some vocals. Send A is then set to send the track to both the Master and the A Reverb return. I'll then adjust this send to raise or lower the amount of reverb I want.
A - ReverbThis return generally has Reverb with the Ambience Medium preset. I'll generally follow it up with a Side Chain Fakey to get it to pump a bit with the mix.
B - DelayThis return generally has a Filter Delay with the Go Mid preset. You could always use a Grain Delay or even a Ping Pong delay for something different.
C - PercThis is where all of my drum sounds are sent (except for the kick). First and foremost this return has a high pass filter to roll-off frequencies below about 150-350Hz. This gives the kick and bass room in the mix. I may also apply some compression to get the percussive parts to gel nicely. Send A is then set to send the track to both the Master and the A Reverb return. I'll then adjust this send to raise or lower the amount of reverb I want on the percussion.
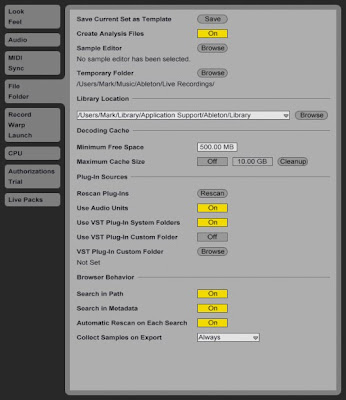
So once you've got you template setup you are going to want to save it such that it loads everytime you start up your DAW. Now I am not completely sure about other DAWs but in Live you can save your template quickly and easily. Just click on that top button in the File/Folder Preferences. Do it!
So give the template a go. It might work for you, get you writing songs quicker or you might totally hate it and the way it might makes you write. I must admit that sometimes I don't use the template. I'll start up Live, delete every track and start from scratch. This is completely healthy too. It gives you the chance to try out new things. new routing strategies and new techniques. Hey, sometimes I'll even just start up one synth on one track and tweak sounds for hours and hours on end. Enjoy it.
Things to try at home- Pay attention to what you consistently pull into your sets when you start a new one. Are there some things you always do? Why not throw them into a template to help get you writing quicker.- Try my template. Download it here and give it a go. If you like it, just save it as your own template in Live. It will work on Live 7 and above.


