Pretension is a Brisbane based electronic producer who is determined to make his mark on the Australian dance music scene. This blog explores how he uses various production techniques in his past and present releases. Check them out!

The Fruits of a Remix Comp

I've been entering remix competitions for years. Big ones, small ones, local ones and international ones. I've never won a comp but I've had a hell of a lot of fun entering.

Remix competitions are great. They allow you to dig into a track and really discover how it was created. They help you hone your skills and sometimes even pull you out of your production comfort zone but most importantly they help you develop a healthy habit of actually finishing songs.

I've thrown up a couple of remixes that I've completed in the last couple of months. Some of you may have known about the comps and some of you may even have entered.

Steve Angello - Tivoli (Pretension Remix)

Riva Starr - I Was Drunk (Pretension's Baltic Bash)

So have a go at the next remix comp you see. It's great practice and there are always plenty of prizes on offer.

Bookmark and Share

Pretension has been pressed to CD!

I take great pleasure in letting you guys know that one of my remixes has been pressed to CD! It might not have been a big thing a few years ago but in our stampeding digital age, a physical copy of a tune really is a big thing, for me anyway!

The tune is Winston & Yoddy - Deeper (Pretension Remix) and I am super proud.


I've just ordered my copy from here.

Bookmark and Share

Funkaine (Pretension Remix) - Winston & Yoddy

It's out, it's getting a good response from the likes of Mark Dynamix and Matt Rowan and it's working it's way up the release charts.


<a href="http://pretension.bandcamp.com/track/winston-yoddy-the-kid-pretension-remix">Winston &amp Yoddy - The Kid (Pretension Remix) by Pretension</a>

Well done Winston & Yoddy on another solid release. Glad I could ride the remix wagon!

Bookmark and Share


Bass Traps & Acoustic Absorbers Pt. 3 - Mounting & Overall Costs

Over lest the last couple of weeks I’ve written up about how I designed and constructed the acoustic treatment for my home studio. Last week I even put together a short video about the difference that it makes.


Today I’m going to give you a quick rundown on how I fixed these panels to the walls and ceiling of my room and the overall costs involved in doing such a project.


Mounting


Here are a couple of pics showing you how I fixed my acoustic panels to the ceiling of my room.


As I stated last week, I have an i-beam running down the centre of my studio. I fashioned some brackets out of 6mm threaded rod and used stiff wire to hang the panels. In your studio, you might need to screw hooks or eyelets into your ceiling to hang the panels.


The panels on the walls were then hung with fishing line from the upper skirting board. You can then use stiff foam or leftover wood to displace the panels about 100mm from the walls.


The bass traps were simply wedged into the corners. My ceilings are 2200mm high to I made my panels to fit snuggly.


Costs


This is a breakdown of the overall costs of the project. All prices are in Australian dollars and the best prices were sought where possible.


The overall project cost about $500 but this is assuming that you have access to the required tools: saw, angle grinder, staple gun, drill and scissors.


From these prices, you can estimate that each floor to ceiling bass trap cost about $110 to construct and each 600mm x1200mm acoustic panel cost about $44 to construct.


Doing a quick search on the internet, I have found that an equivalent commercial 600 x1200mm panel costs about $200US. If you’ve got the time and you’ve got a good DIY attitude, I would highly recommend building your own panels.


I hope you’ve enjoyed these articles on DIY acoustic treatment. Feel free to leave a comment or shoot me an email about your own projects!


Bookmark and Share

DIY Acoustic Treatment - Before and After Comparison

I just created this video so you can see and hear the effect of the acoustic treatment on my studio.

Enjoy!


Read about it here and here.

Bookmark and Share

Great Ebook on Promotion

Not long ago, I did a quick write up on various blogs that I read and other interesting stuff online. I hope you've had a good look at those sites and get as much out of them as I have.

Just recently, I have discovered a great ebook on promoting yourself as an artist, a label or a club promoter. It is called Maximum Promo Vol. 1 and it was written by Keiren Brown, who runs a site called The GroundZero Project. The book covers fairly straightforward marketing and promotional techniques but does it with a fantastic dance/club music perspective. It's an easy read, it's got some great tips for aspiring superstars and guess what? It's free!


Check it out here: DOWNLOAD

And, be sure to check out http://www.groundzeroprojects.com/ They've got a pretty healthy forum community over there discussing DJing, Production and all things noisy.

Enjoy.

Bookmark and Share

Releases


Remixes
Winston & Yoddy "Funkaine" [Elektrax]
Goldtrax "Sun, Sand, Sex & Sea" [Silver Sneaker Records]
Coming Soon...
Racim & Niko Spencer "Far Away" [DJ Center Records]
Winston & Yoddy ft. Caroline "Deeper" [Kitschy Records]
Damn Arms "Destination" [Unreleased]
Benny Electric vs. The Greenmatics "I Love Technology" [Silver Sneaker Records]
Benny Electric vs. Knives at Noon "Heat Up" [Silver Sneaker Records]
Winston & Yoddy "Beautiful People" [Vinyl Pusher]

Bookmark and Share

Bass Traps and Acoustic Absorbers Pt. 2 - Construction

Okay, last week I went through the concept and design process and this week I’ll be running through the construction process.


Frames


As I said last week, all of the frames are made from 18mm x 38mm pine. It’s cheap, strong enough and easy to work with. To make it even easier to get square corners I made up a little jig with some scrap pieces of wood.


You can also see how each corner was fastened in this picture.


I then went through the process of rigging up the frames in my room: 1. to check how they would all fit in and 2. as it was a lot easier to hold and fasten light wooden frames rather than complete acoustic panels.


As you can see, I am lucky enough in my room to have an i-beam running down the centre of the studio which makes it super easy to fix the panels without having to drill holes. The panels on the ceiling were hung with stiff wire (roughly 1.5mm dia.).


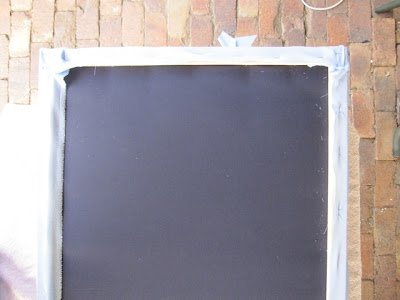
I then took all of the frames back outside to fix the backing fabric. You can see that I used staples about every 100mm to hold the fabric to the inside of the frames.


Cutting Insulation


The next job was to cut the insulation. Tontine Acoustisorb 3 is fairly easy to handle but rather difficult to cut. I took the hint from Timothy Allan when he built his acoustic panels and decided to use an angle grinder with a cutting blade to cut the sheets. I first attempted with scissors first but quickly found that my scissors would become blunt after cutting through about half a metre. So, I used a pen to draw up the straight cuts on the sheets and then ran the angle grinder through them.


One entire pack (three 1200x2400 sheets) was used to make the two corner bass traps and the other pack was used to make the six smaller acoustic panels. This picture shows the insulation on the wooden frame.


Finishing


Before wrapping the panels in fabric I stapled the first sheet of insulation to the wooden frames. This would help prevent the insulation from sliding down the panels over time.


In this picture you can see how the fabric is then wrapped around the insulation and fastened to the back of the frames with staples. I would always fasten one long side of the the panels and then the opposite side to ensure that the fabric was pulled tight. For some of the panels I had fabric with stripes so this technique would ensure that the lines were aligned to the frame. Here is one finished floor to ceiling bass trap.


In The Studio


Here they are, finally in the studio. The floor to ceiling bass traps were just large enough to wedge in the corners and didn’t require andy fastening. The panels on the walls are just propped up for the moment but will be fixed with fishing line to the upper skirting board shortly. I also have one panel that is hung directly behind the mixing position that you can’t see in these pics.


The Verdict


Incredible. It is amazing the difference this acoustic treatment does. Flutter echoes are no longer an issue, the bass response of the room is so much tighter and stereo imaging is pristine. I can tell that is going to be a pleasure to mix in this room. If I can get a hold of an acoustics measuring kit I’ll run some tests but next week I’ll show you guys a video that I am putting together with some before and after audio samples. Stay tuned.


Feel free to leave your comments.


Bookmark and Share


Bass Traps and Acoustic Absorbers Pt. 1 - Concept Design

Now, I am by no means an acoustics expert so I think that these articles can stand as a good discussion forum. Make sure you leave a comment if you have any suggestions for the design and we can help anyone that is keen to build their own.

Background

When designing these acoustic panels I had a few limitations:

  • I am renting so any panels need to be attached with minimal damage and easily removed when I move out.
  • Panels need to be suited to different rooms as I don’t know what my next studio will be like.
  • I am only working part time, so all costs need to be minimised ie. little or no wastage.
  • The two corners behind my listening position are difficult to access as one has a window and the other has a large piece of immovable furniture

My room is square, 4.6m x 4.6m x 2.25m with two brick walls and two plasterboard walls. As you can imagine standing waves and flutter echoes are serious problems in my room. I’ve done a few quick calculations using a room mode calculator and have found that axial room modes occur at around 37Hz, 74Hz, 158Hz, etc. as well as other complex derivatives. I could aim to tackle these frequencies individually using tuned bass traps but I have opted for more versatile broadband bass traps and acoustic panel designs. This involves using insulation to absorb troublesome frequencies.

As standing waves peak at the walls and in the corners of the room, this is where I want to place my traps. Try it. Stick your head into the corner of your room and hear how the frequency response changes. I have considered the use of Superchunk bass traps but have opted to build self standing panels that don’t require being built into the room. It will also make it easier to move to my next studio.

Concept

After much deliberation I decided to build two floor to ceiling 600mm wide x 150mm thick bass traps and six 1200mm wide x 600mm high x 100mm thick broadband absorbers. One of the main reasons for this arrangement was due to the size and availability of acoustic insulation. The insulation that I have chosen to use is Tontine Acoustisorb 3. It is comparable to Owens Corning 703 (one of the most used studio insulation materials used in the USA) and comes in 1.2mx2.4mx50mm sheets.

I briefly looked at normal house insulation products but couldn’t find a material that had the density that I required. Acoustisorb 3 is 48kg/m3 and does not require personal protective equipment to handle or cut, which is a bonus. It also means that I don’t have to worry too much about covering. Acoustisorb 3 comes in a pack of three sheets so I will use one pack to construct the bass traps and a second trap to construct the broadband absorbers.

Design

Many DIY bass traps use 100mm or 150mm wide pine as a simple and strong way of framing the insulation. However, any sound waves contacting these frames is going to be reflected so some people then cut holes and patterns out of the wood to increase the effective surface area of the traps. As Acoustisorb 3 is fairly rigid I can get away with having a fairly simple frame. Rather than framing the insulation, I am going to provide a skeleton for it to be mounted to. I can then use this frame to attach it to the wall.

Down at my local Bunnings there are dozens of different wood cross sections to choose from. I finally decided on 18mm x 38mm x 2.4m lengths of pine as they are rigid enough in both axes as well as being reasonably priced at a convenient length (about $4.80 /length).

You could then construct the frames using pre made L-shaped brackets but I have opted for the simplest and cheapest option. Each corner requires two 50mm wood screws (8 per frame) which minimises drilling and provides enough rigidity to not need cross bracing even on the floor to ceiling frames.

Wood frame fixing sketch

Further Reading

http://www.ethanwiner.com/basstrap.html - Great DIY bass trap article.
http://www.gearslutz.com/board/bass-traps-acoustic-panels-foam-etc/ - forum community dedicated to acoustics and production.
http://www.stereo.net.au/forums/forumdisplay.php?f=17 - An Australian based forum dealing with acoustics.
http://www.radford.edu/shelm/acoustics/bass-traps.html - Fantastic article on building similar acoustic panels.
http://www.spec-net.com.au/company/tontine/acoustic/acous6.htm - Specs for the Tontine Acoustisorb 3.

Next Week

So next week I'll go through the construction process and outline a few tips to help you build the panels a bit quicker and easier. I'll have some pics then too so you can see what they look like. Got any suggestions / questions? Just leave a comment. Do it!

Click here to go to the next installment.


Bookmark and Share


Templates For The Win

I often visit different forums to learn new tricks, keep up to date with new technology and techniques and sometimes just to hang out and talk trash amongst other fellow producers and studio junkies.


A few days ago a user posed the question "Which part of the song do you write first?". Now after a few responses it was clear that there was no one way to start a song. Some people start with a bassline. Some people start with drums or a groove. Some people start with a synth riff. I've even heard in an interview with the french producer, Martin Solveig, that he would start by sitting in front of a microphone and make random sounds and noises until he found one he liked.


So that's all well and good; everyone is different and we each work in different ways. Eventually one user mentioned that they load up their basic template and go from there. This made me think about my own template and how I use it. I know that it has saved me a lot of time in the studio. After starting a few songs I realised that I would be grabbing for the same effects and presets for different tracks. So, why not turn that base set into a template?


I'll take the time to tell you about my template, how I have everything set up and why. Once again, this isn't the only way to put together a template but it helps me and it may help you.


My base template consists of 8 tracks (Kick, Bass, Snare, Hats, Percussion, Synth 1, Synth 2, and Vocals) and 3 return tracks (Reverb, Delay, Perc).


1 - Kick

This audio track is solely for my main kick drum. On this track I've got a high pass filter to cut out all the muddy frequencies below around 25Hz. I've also got a frequency analyser to help me EQ the bass to get it with sit with the kick.


2 - Bass

This midi track is for my main Bass synth; Blue, Bassline, Elek7ro etc. As with the Kick track I've got a high pass filter to cut out all the muddy frequencies below around 25Hz. Using a frequency analyser and an EQ I can then EQ the bass to get it to sit with the kick. See my previous post on Kick and Bass EQ.


3 - Snare

As I tend to write my drums first the next audio track is for the snare drum. There are no effects on this channel but it is routed only to the C Perc return. More about this later.


4 - Hats

This midi track is loaded with an Impulse to look after all my hat samples. There are no effects on this channel but it is routed only to the C Perc return.


5 - Percussion

This audio track is ready for chopped up percussion styles. Sometimes I'll even duplicate this track depending on how many layers I end up working with. There are no effects on this channel but it is routed only to the C Perc return.


6 - Synth 1

This midi track is ready for my main synth line. On this track I've got a high pass filter to roll-off frequencies below about 150-350Hz. This gives the kick and bass room in the mix. Send A is then set to send the track to both the Master and the A Reverb return. I'll then adjust this send to raise or lower the amount of reverb I want.


7 - Synth 2

Same as above.


8 - Vocals/Samples

This audio track is for the vocals or any melodic samples that I end up using. On this track I've got a high pass filter to roll-off frequencies below about 150-350Hz. This gives the kick and bass room in the mix and also removes those popping sounds that you get in some vocals. Send A is then set to send the track to both the Master and the A Reverb return. I'll then adjust this send to raise or lower the amount of reverb I want.


A - Reverb

This return generally has Reverb with the Ambience Medium preset. I'll generally follow it up with a Side Chain Fakey to get it to pump a bit with the mix.


B - Delay

This return generally has a Filter Delay with the Go Mid preset. You could always use a Grain Delay or even a Ping Pong delay for something different.


C - Perc

This is where all of my drum sounds are sent (except for the kick). First and foremost this return has a high pass filter to roll-off frequencies below about 150-350Hz. This gives the kick and bass room in the mix. I may also apply some compression to get the percussive parts to gel nicely. Send A is then set to send the track to both the Master and the A Reverb return. I'll then adjust this send to raise or lower the amount of reverb I want on the percussion.


So once you've got you template setup you are going to want to save it such that it loads everytime you start up your DAW. Now I am not completely sure about other DAWs but in Live you can save your template quickly and easily. Just click on that top button in the File/Folder Preferences. Do it!


So give the template a go. It might work for you, get you writing songs quicker or you might totally hate it and the way it might makes you write. I must admit that sometimes I don't use the template. I'll start up Live, delete every track and start from scratch. This is completely healthy too. It gives you the chance to try out new things. new routing strategies and new techniques. Hey, sometimes I'll even just start up one synth on one track and tweak sounds for hours and hours on end. Enjoy it.


Things to try at home

- Pay attention to what you consistently pull into your sets when you start a new one. Are there some things you always do? Why not throw them into a template to help get you writing quicker.

- Try my template. Download it here and give it a go. If you like it, just save it as your own template in Live. It will work on Live 7 and above.