Pretension is a Brisbane based electronic producer who is determined to make his mark on the Australian dance music scene. This blog explores how he uses various production techniques in his past and present releases. Check them out!

Saturated Phat

Okay, so you have heard me ramble on about how to get your kick and your bass to sit tight together, but what do you do if you just want your bassline to sound fat, dirty and generally warble around like our friends, The Crookers? I have discovered one of the simplest tools around that can push you a little closer towards the PHatness. Yes, that’s right with a capital P.H.

Enter Saturator!

Now the trusty Ableton manual says,

“Saturator is a wave waveshaping effect that can add that missing dirt, punch or warmth to your sound. It can coat input signals with a soft saturation or drive them into many different flavors of distortion.”

Fairly straightforward hey? Think of the saturator as an effect that adds colour and warmth to the sound you run through it. If you are hunting that dynamic, analog-esque sound from your stale digital synths and effects, then keep reading. If you’ve got no idea what I am on about, keep reading.

Let me show you with an example. Here I have the 1st unsaturated bass riff:


I have used the wonderful TAL-Bassline for this riff and dropped a sidechain fakey on it to get it to pump with the kick. It’s nice. It’s got a solid square wave and it could almost pass as the real Roland SH-101.


But is it enough? You’ve heard the sound before on every 2nd electro house tune out there but you are one of the few producers who strive to be different, strive to be unique.

Now with the Saturator and the “A Bit Warmer” preset:


Did you notice the change in temperature? Can you feel the warmth. The low end of the bass feels more whole and certainly has a lot more character. Here is the riff in the context of the song:


Now this second sample is a slightly different sounding bass:


It’s run though a low pass filter to cut all the high frequencies. Don’t worry though; the distortion provided by the Saturator will bring back all the high frequencies we want.

Now with the Saturator and the “Rectifier” preset:


Now this sound gets me excited. You’ve got the bass driving through underneath with plenty of portamento. With this riff, however, I’ve automated the cut off frequency and resonance on the low pass filter to give the saturator something to bite onto. The bass is moving and opening up over the eight bars. Here it is in the context of the song:


Now it’s time for you to try it at home:

- Throw any sound at the Saturator, see what sticks and remember what sounds good.
- Experiment with the dry/wet mix of your saturated and unsaturated sounds. Especially useful for big dirty build ups.
- Mess around with the settings. Especially with the Color Frequency.
- Experiment with high pass or lo pass filter before or after the Saturator. You’ll be amazed how drastically the sounds change when you cut a few frequencies out.

If you like what you’ve read, tell a friend. Email, post, carrier pigeon or just hit the "Share" button below.


Bookmark and Share

Video, What?


What is this? A video? Pretension doesn’t make videos. ENjOY Productions, however, do make videos. Damn fine ones at that!

Jacob and the guys at ENjOY were kind enough to throw a little bit of their talent around and came up with this fantastic music video for Winston & Yoddy vs. Pretension “What You Do ft. Kyla Sexton”. Unbelievable, hey?

Here is a little blurb about them:

“We’re an established, full service, award winning Film Production Company based in Brisbane, Australia. Working on boutique and mainstream projects, our mission is to enjoy the art of film making to create unique and timeless motion pictures.


We approach all projects with a fresh creative edge from small run DVD projects to big budget music videos and films. With a solid team of directors, producers, cinematographers, designers, composers and performers, we have the means to bring quality projects to the screen, web, iPod, iPhone and any other new media you want to throw at us.”

So that’s enough words for today. The proof is in the pudding. Go check out their films here and be sure to keep them in mind for your next music video!


ps. Do you recognise anyone in this video?

Kick & Bass EQ

Now some of you might be sitting there, thinking “I read your last post on faking the sidechain effect but I absolutely loath that sound and I want it (and anyone who uses it) to die a long and painful death”. That may be a little harsh but you still want your kick and your bass to play nice right? EQ is the next tool that you are going to need in your tool box.

I know that I have often started work on a tune; I have found the perfect kick drum that works so well with the rest of my percussion and I have created the most mind-bending bass patch known to man (well maybe not every time). The problem, however, comes when I try to put the two together. The frequencies of the kick start fighting with the frequencies of the bass and suddenly my master is in the red and I’ve got mud everywhere.


Time to EQ.

The process starts by finding out what frequencies are dominant in both the kick and the bass. Now, I use the Spectrum analyser that comes with Ableton Live but there are some other plugins out there such as Voxengo SPAN that can also be used. Live’s Spectrum, however has a great “Bass Analyser” preset that takes out the hard work of setting up.

As soon as you load it up on your kick track you may want to adjust the settings to make it easier to read. Try increasing the Avg up to 8 and reducing the Refresh rate. You can also double click on the graph to get a larger view of the waveform.

So here is what my kick looks like:

From this graph we can see that the loudest part of the kick is between 50 and 60Hz with not much audio power below 50Hz.

The same graph for the bass looks like this:


The loudest part of the bass is at about 50Hz with the next harmonic at about 100Hz and there is heaps more sound below 50Hz too. We can immediately tell that we’re going to have issues.

So the first decision I need to make is whether to EQ the bass or the kick. I tend to stick to the rule “If it moves, EQ it”. In this case, my bassline is moving up and down octaves. If I EQ it, it can dance around as much as it wants, (above, below or across the main frequencies of the kick) and still leave a space for the kick to sit in.

If you’ve got one of those basslines that drone along on the one note (I too am guilty of these) then you could EQ either the bass or the kick. However, you’ll probable want to EQ the element that has the least power in the mix. Make sure you experiment.

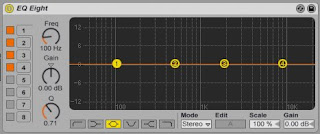
So, back to it then. I’ve dropped an EQ Eight onto my bass track (just before the Spectrum).


I then pulled the little “1” around until it looked something like this.


So with the loudest frequencies of the kick being between 50 and 60Hz, I then want to cut those frequencies from the bass. You can dial in the exact frequency with the Freq dial and make sure you experiment with the Q. Remember that with a lower Q value, the cut in frequencies will be wider and you will lose more of your bassline.

After a bit of tweaking, the kick and bass now sound like this:


And in the context of the song:


Note:
- It may be difficult to EQ if both the kick and the bass share the exact same frequency band. You may want to try re-pitching the kick or bassline or even syncopating your bassline so it doesn’t strike on the same beat as your bass.

The sounds in this tutorial belong to a remix that I just did for the Damn Arms Bang Gang Remix Competition. Check it out!


If you like what I've done with this track, click on "Share" on the player above and let your friends know about it.

Releases

Okay, this is where you will find my releases. I've even managed to pull together these helpful little icons to help you track down where to buy each track.

Benny Electric “Heat Up” [Silver Sneaker Records]

Coming soon...

Racim & Niko Spencer “Far Away” [DJ Center Records]


Winston & Yoddy “Deeper ft. Caroline” [Kitschy Records]


Winston & Yoddy vs. Pretension “What You Do ft. Kyla Sexton” [Silver Sneaker Records]


Benny Electric & The Greenmatics “I Love Technology” [Silver Sneaker Records]


Winston & Yoddy ft. Andew Worboys “Beautiful People” [Vinyl Pusher Records]

The Sidechain Fakey

Okay this first lesson is going to be on faking the sound produced by a side chain compressor.

Now, we all know and love the sound of a dirty bassline pumping and pulsing off the beat of a kick drum. It’s been used for years by the likes of Daft Punk and Eric Prydz and chances are, your favourite tune right now is using it in one way or another. It sounds great on bass, synth, pads or vocals and can be used to help your bassline sit nicely with your kick drum. (EQ is also helpful but I’ll get to that in a later lesson)

SonicTrasfer have done a great write up on how to do it using a sidechain compressor and the guys at ProJuice have even put together a snazzy video. Today, however, I’m going to show you how to fake it. I no longer use a sidechain compressor to get my basslines ducking and my pads pumping. I use Ableton Live’s Auto Pan. I find that it uses less CPU, I no longer need a dedicated kick drum track and I can still achieve the desired effect.

So let’s start with the original bassline without the sidechain effect.


Straightforward hey? Now do you hear how it doesn’t play nice with the 808 kick drum?


It’s kind of muddy and you really lose the emphasise of the kick. It’s time for some sidechain faking.

When you first load up Auto Pan onto your bassline track it looks like this:

Now to get a side chain effect, you immediately want to adjust the following things:

- set the Phase to 0.00°
- change the shape of the wave form to
saw
-
Invert the wave shape
- Set the
Rate to ¼
- Set the
Shape to about 50%
- Set the
Offset to 0.00°


Once you have all of these things set you can then adjust the Amount to get the desired effect. You should also play around with the Shape as this can change the groove or swing of the side chain effect.


So here is what the bassline sounds like with the fake sidechain:


And here is what it sounds like with the kick:


And in the context of the song:


Other Tips
- Try the fake sidechain on pads, vocals, synths and whatever else you can get your hands on.
- Experiment with two Auto Pans in series. Use the settings above for both but adjust the
Offset of the second Auto Pan between 300° and 360°
- Try a 1/16 square gate on a second Auto Pan to get that nice fidget sound.
- Lastly, hit the little disk icon on the top right corner of your Auto Pan and save the little guy. It’s certainly a lot quicker than adjusting those settings every time.

Pretentious Lessons Begin!

Okay guys, I am about to start writing a set of production lessons that outline a few techniques that I use when writing and producing tunes. I'll try to keep them relevant to my style and give examples of where I have used them in actual songs.

So, I use Ableton Live 7 with a few different plugins but most of the lessons will use the stock effects that are provided with Live. Not using Live? Don't worry. You should be able to transfer the techniques over to your own special DAW.

Enjoy!

Disclaimer:
I am by no means saying "my style is the best" or "my technique is the best". I am just sharing a few ideas that help me make better sounding tunes, faster. Have you got an opinion or further ideas? Feel free to leave a comment. 

Also, a big thanks must go to Natalie at Utopian Vision Photography for the stunning photos!